This is my first post in english. But it’s actually one I’ve been meaning to write and put up here. Here it is.
The thing is I made myself a cantenna. The computer I use at home is some distance away from the router, and I’m not able to make a run of ethernet cable from the router to the computer, so I use wi-fi to connect the computer to the net. The problem was the antenna included with the wireless card (a linksys wireless PCI card). It just didn’t really work out. We (that is, my wife and me) often got disconnected, high latency, and all the crap that goes along with a crappy connection. So that’s where I got the idea to make a cantenna.
Looking on the net how to make one I got time and time again to this site: How to build a tin can waveguide antenna. The page is quite complete and gives you all the basics, including any components you might need.
That’s all good. But the page is made with components that for most people might be out of reach. They’re all good, but here is my better simpler cheaper guide to making a cantenna. Here are the ingredients:
- 1. A can
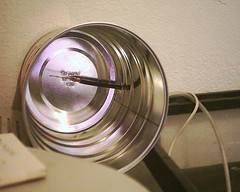
- In my case, it’s a baby formula can. You can use any kind of can you like, from a pringles can to a big menudo can. The longer the can, the better, cuz it increases reception.
- 2. A bit of cable
- I bought three meters of coax cable. I was sold the thin kind of cable due to the SMA connector. I don’t remember the exact name… but it’s still cable.
- 3. SMA connector
- It’s not that known yet. I decided to use this instead of a mount type-N connector and a pigtail. Reasons below.
Of everything, the hardest thing to find was the SMA connector. At the Steren shop they didn’t know what I was talking about. When they have stuff you need, it’s all good though.
Since they didn’t have it there, I was told to go to the electronics shop next door, called Electronica Madrigal, I think… but they did have the piece there. They put up with me for about an hour while I looked at their catalog. That’s when I hit upon a direct SMA connector for coax. I decided to use this to avoid using a type-N to SMA pigtail. Since the computer gets moved a lot within the enclosed space it’s placed in, I believed it better to use it to avoid putting stress on the network card’s connector (Read: saw the prices, told them to go to hell. Mentally, of course). I also got 3 meters of coax cable.
For those two things the total price was 50 pesos (around US$5). The most expensive thing was the SMA connector. I do remember the type-N mount being about 60 pesos (around US$6) and a type-N to SMA adapter being $80 (around US$8), so buying the straight connector saved me some money.
So let’s keep going with the guide:
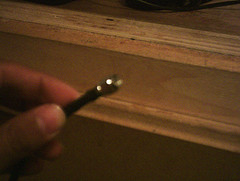
- 1. Put the SMA connector on the cable, just like it kinda looks in the picture
- 2. Remove the plastic covering from the other end of the cable, in such a way that about an inch and a half of the central wire bare.
- 3. On the can, make a hole. Where? Read on.
- 4. Put the bare end thru the hole in the can, just like it looks in the picture.
- Plug the cable – the end with the SMA connector, obviously – to the network card.
For the details on where to make the hole, go to the turnpoint page. Once there, go to the calculator and put the diameter of your can there. The can I used it’s 5in in diameter, so the calculator said to make a hole about 1.47in from the bottom of the can, so I did. The page also says to use a drill to make the hole. I used a nail and that was enough.
After playing a bit on where to put the can to get the best reception, it ended up between the monitor and Mini’s aquarium. A bit strange since it doesn’t even point in the direction of the router, but hey, it works. The antenna also has linear polarization, which means that the rotation of the can influences quality and strength of the signal received. So you have to play with rotating the can. In my case it’s turned to a 4 o’clock position. It probably will be different in your case.
I almost forgot… most wireless cards that can take an external antenna use SMA connectors, so you can make a cantena and see how it works out with your hardware. Same goes for routers, but your have to configure the antennas correctly to avoid troubles. In case of doubt, ask the algorithms ( google/yahoo/msn ok?)
That’s pretty much it. The longest part was getting the pieces. Assembling everything took me about an hour, and another hour testing placement and rotation of the antenna. And that’s it, noeshtiosita has problem-free wi-fi. All of the guides I looked at ask to use pigtails and mounts. I did it cheaper than most and simpler than most.
The final result? For 5 bucks and two hours of good entertainment? A stable connection to the net and less headaches. Not bad.
Congratulations !!!!!